

TL;DR: You can customize a Windows 11 default profile by copying a reference user’s Start menu, defining taskbar pins with XML, and setting default apps and wallpaper with DISM or Group Policy, but these changes are only partially supported and may reset with updates.
Customizing the default profile in Windows 11 can help preconfigure taskbar layouts, default apps, and certain user settings before deployment, giving new users a more consistent starting environment.
What changed with the Start menu in Windows 11 default profiles?
Windows 11 no longer supports the XML-based Start menu customization used in Windows 10. Instead, the Start menu layout is stored in a per-user binary file (commonly start.bin or start2.bin). While copying this file into the default profile can work on specific Windows 11 builds, it’s undocumented, unsupported by Microsoft, and prone to breaking or changing with feature updates.
How do you customize the Start menu in a Windows 11 default profile?
To customize the Start menu in a Windows 11 default profile, follow these steps:
Remove apps pinned to the Start menu by default by right-clicking on the app and clicking Unpin from Start. Leave any of the default apps you wish to keep.
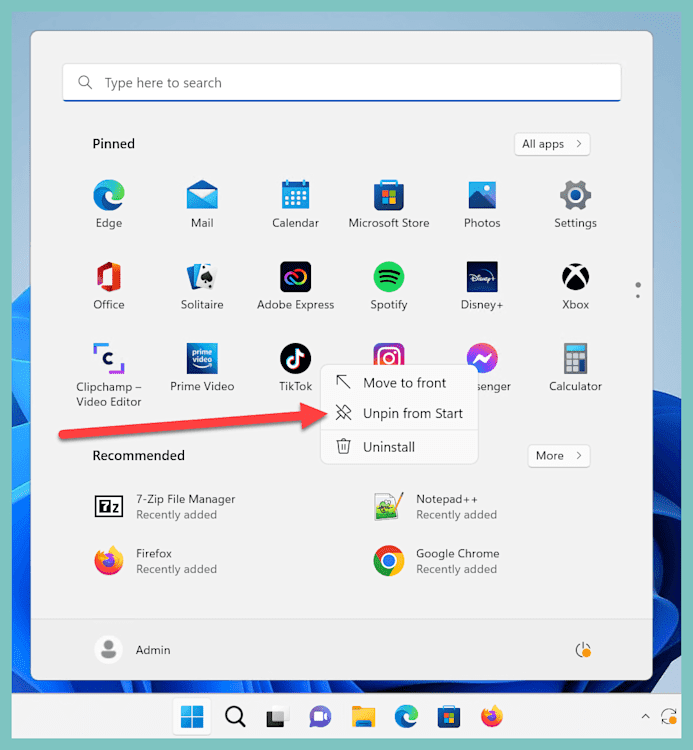
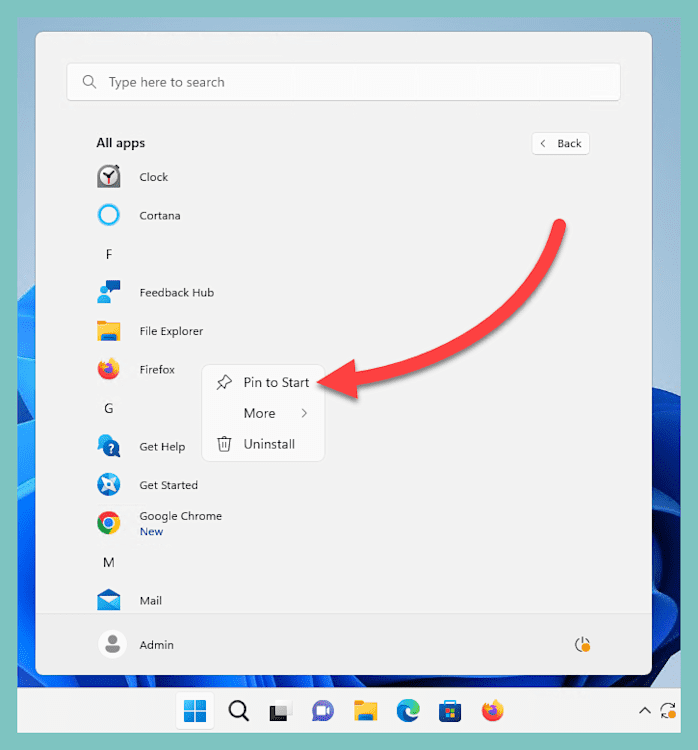
To add app pins to the Start menu, click All apps. Then, right-click on the apps you wish to add, and click Pin to Start.
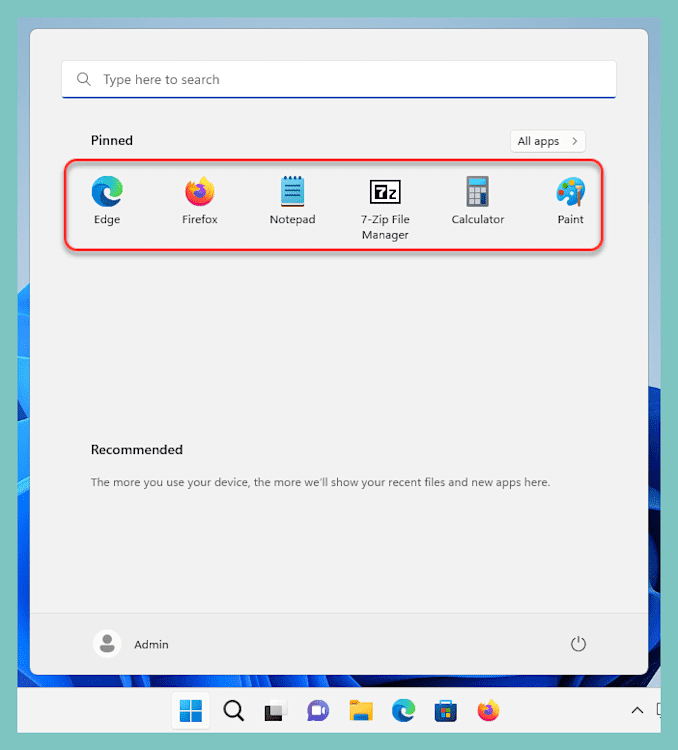
Continue adding and removing app pins until your Start menu is fully customized. You can rearrange app pins by clicking, holding, and dragging the pin into place. Here is my finished Start menu layout.


With our Start menu customized, we’ll use Robocopy to copy the start.bin file, which contains the Start menu layout captured from the reference user. The start.bin file is located at:
C:\Users\<username>\AppData\Local\Packages\Microsoft.Windows.StartMenuExperienceHost_cw5n1h2txyewy\LocalState
Depending on the Windows 11 build, the file may be named start.bin, start2.bin, or a similar variation.
You can manually create the required folder structure in the default profile, or use this Robocopy script to copy the file and its parent directories from the reference user profile.
Here’s an example Robocopy command that may work on matching Windows 11 builds. This must run from an elevated command prompt on the reference system:
robocopy "C:\Users\<username>\AppData\Local\Packages\Microsoft.Windows.StartMenuExperienceHost_cw5n1h2txyewy\LocalState" "C:\Users\Default\AppData\Local\Packages\Microsoft.Windows.StartMenuExperienceHost_cw5n1h2txyewy\LocalState" "start.bin"
You’ll need to modify username and start.bin to match your environment.
Once the file has been copied, we’re ready to move on to the next step: customizing the taskbar.
Planning your Windows 11 migration?
Don't let the Windows 10 end of life catch you with your backups down — or your endpoints exposed. We've got tools, step-by-step guides, and a whole Discord channel with fellow sysadmins to help you upgrade without losing your cool (or your configs). Visit our Windows 10 End of Life Hub.
How do you pin apps to the taskbar in a Windows 11 default profile?
To pin apps to the Windows 11 taskbar in a default profile, create a LayoutModification.xml file in the default user profile that defines which apps appear for new users. This method is still partially supported in Windows 11. Here’s how it works:
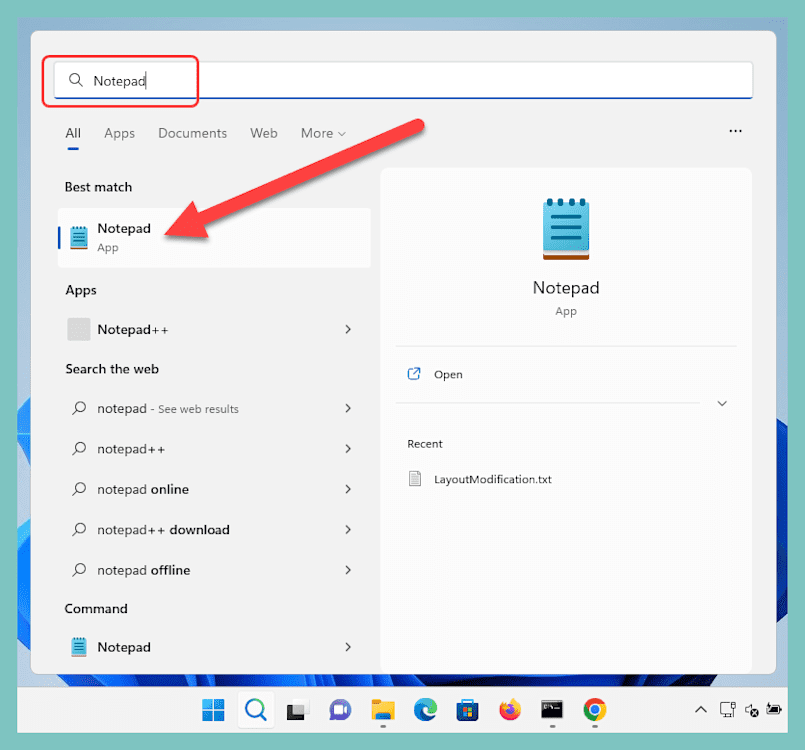
Click on the Start button, then type Notepad in the search bar. Right-click on the Notepad app, and click Run as administrator.
Copy and paste this XML into Notepad:
<?xml version="1.0" encoding="utf-8"?>
<LayoutModificationTemplate
    xmlns="http://schemas.microsoft.com/Start/2014/LayoutModification"
    xmlns:defaultlayout="http://schemas.microsoft.com/Start/2014/FullDefaultLayout"
    xmlns:start="http://schemas.microsoft.com/Start/2014/StartLayout"
    xmlns:taskbar="http://schemas.microsoft.com/Start/2014/TaskbarLayout"
    Version="1">
  <CustomTaskbarLayoutCollection>
    <defaultlayout:TaskbarLayout>
      <taskbar:TaskbarPinList>
        <taskbar:DesktopApp DesktopApplicationID="Microsoft.Windows.Explorer" />
        <taskbar:DesktopApp DesktopApplicationLinkPath="%APPDATA%\Microsoft\Windows\Start Menu\Programs\System Tools\Command Prompt.lnk" />
      </taskbar:TaskbarPinList>
    </defaultlayout:TaskbarLayout>
 </CustomTaskbarLayoutCollection>
</LayoutModificationTemplate>
This XML contains examples of two apps that will be linked to the taskbar: Windows Explorer and Command Prompt. Windows Explorer uses the DesktopApplicationID, and Command Prompt uses the DesktopApplicationLinkPath. You can use either format to add apps to your XML file.
Copy or replace these examples with the apps that you want to add to the taskbar following the structure provided. You can get AppIDs using this PowerShell command:Get-StartApps.Alternatively, you can get theApplicationLinkPathfor most applications from this hidden folder:C:\ProgramData\Microsoft\Windows\Start Menu\Programs. Here's my finished XML using some LinkPaths and some ApplicationIDs: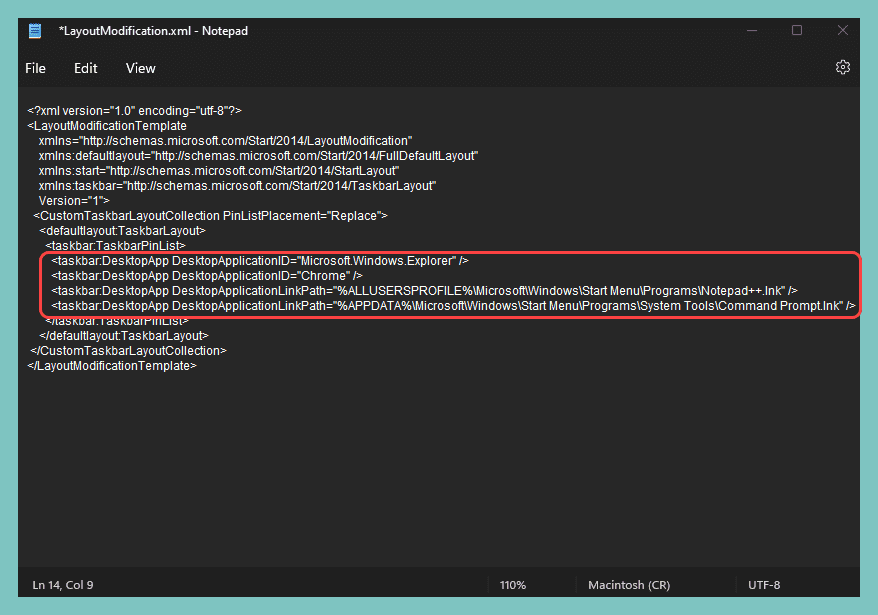
Once you’ve modified the XML, click File > Save As.
In the Save as window, navigate to
C:\Users\Default\AppData\Local\Microsoft\Windows\Shell.Name the file
LayoutModification.xml.Click the dropdown menu next to Save as type and select All files (*.*).
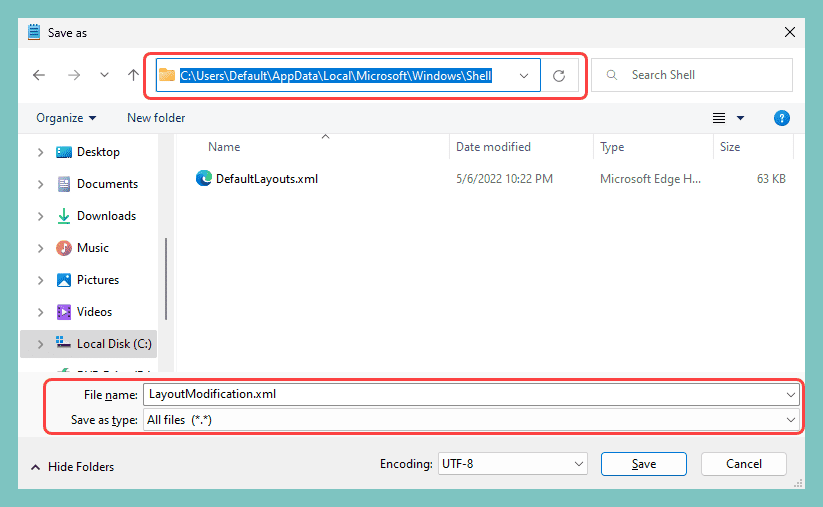
Click Save.


With the LayoutModification.xml file in place, newly created user accounts may only have the pins specified in the XML file on their taskbar. Users can modify and add their own pins after logging on.
At this point, ensure your Start menu and taskbar settings are applied correctly by creating a new local user account and logging in to it.

With the new account created, log in and ensure your customizations carried over.

You can see that both the Start menu and the taskbar contain the app pins we specified.
How do you set default apps in a Windows 11 default profile?
In Windows 11, default apps are set by configuring them on a reference system, exporting the settings to an XML file with DISM, and then applying that file during deployment or with Group Policy.
Default application associations ensure the correct application launches when a user opens a specific file type. While the process of exporting and importing applications associations hasn’t changed much since Windows 10, it’s worth highlighting.
Set default applications
Here’s how to set default apps in Windows 11:
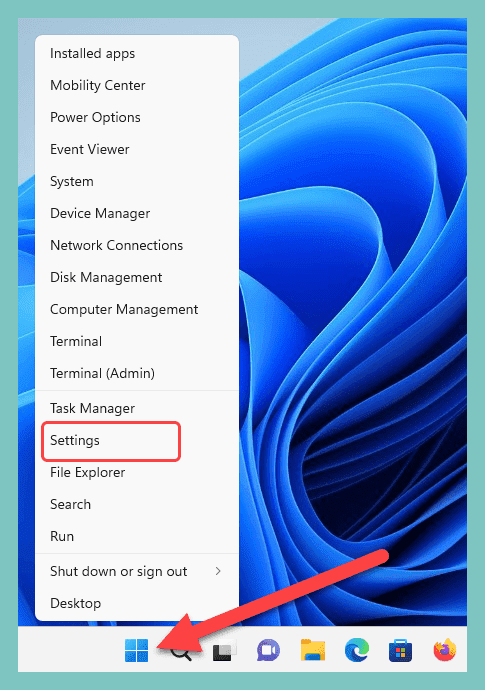
Right-click on the Start button, then click on Settings.
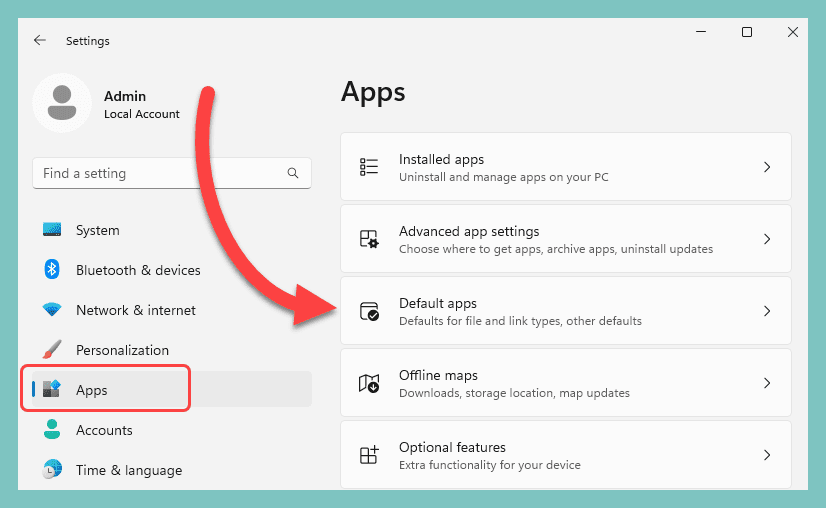
In the Settings menu, click Apps, then click Default apps.
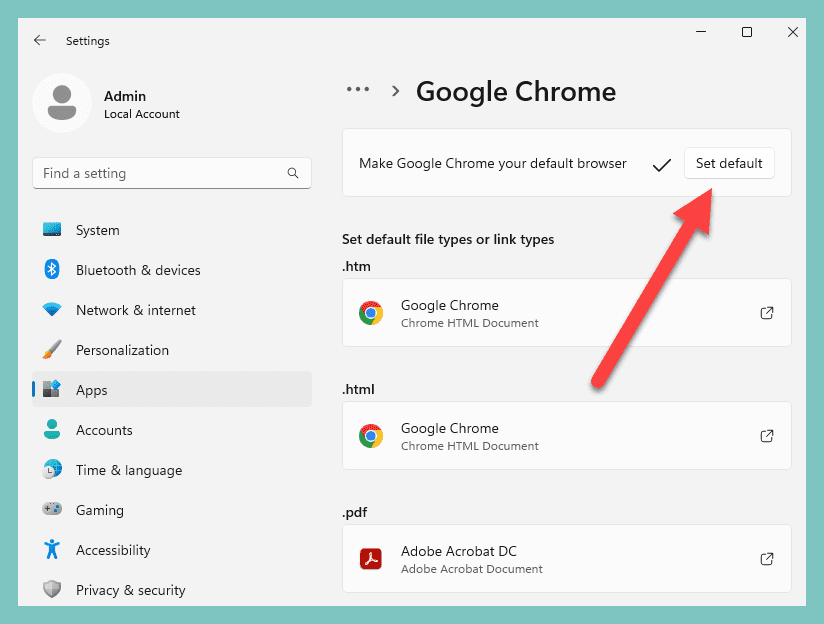
Click on any application you want to set as a default.
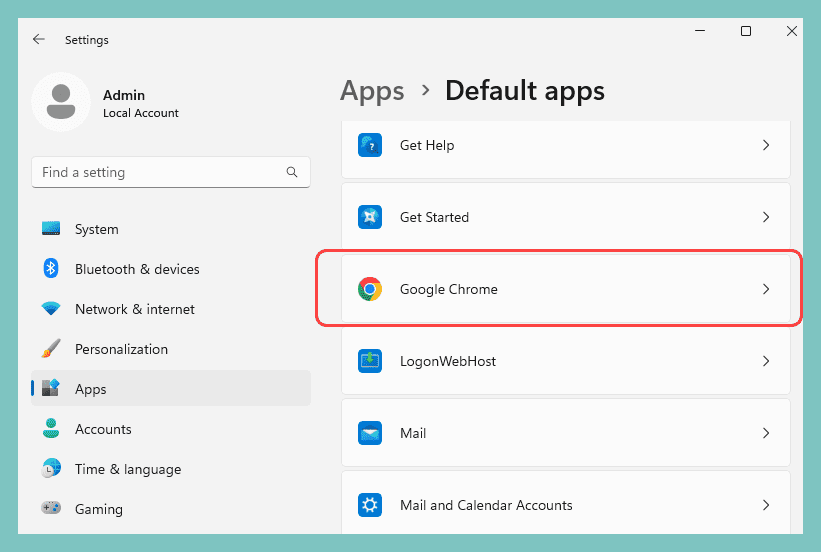
Manually assign each file type association, or click Set default.


Export a default application association XML
With our defaults configured, the next thing we need to do is export these settings.
Click the Search button on the taskbar, then enter cmd into the search field.
Right-click on the Command Prompt application, and click Run as administrator.
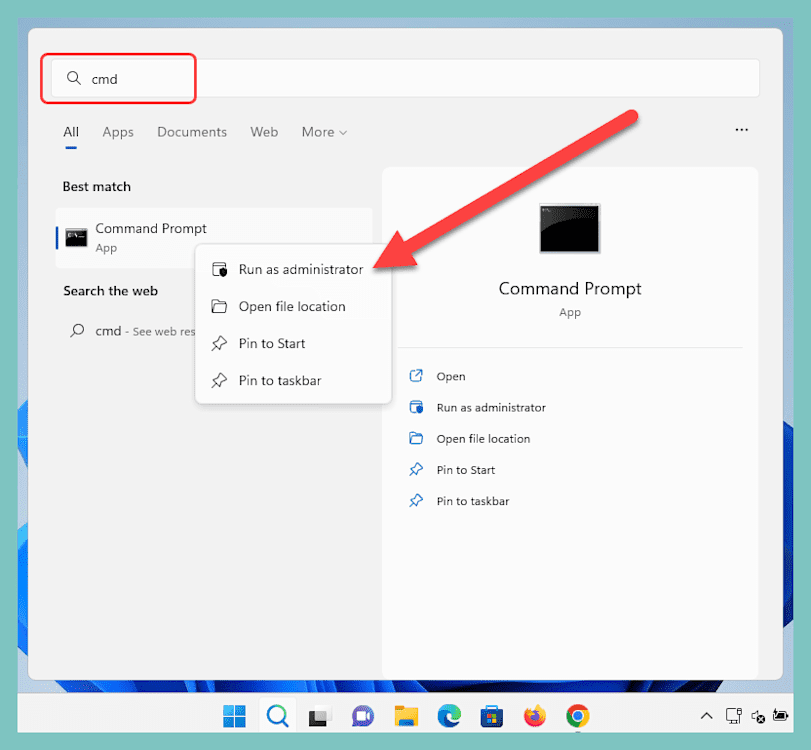
If prompted to allow the app to make changes to your device, click Yes.
Run the following command:
Dism.exe /Online /Export-DefaultAppAssociations:\\<server_name>\<share_name>\Appassoc.xml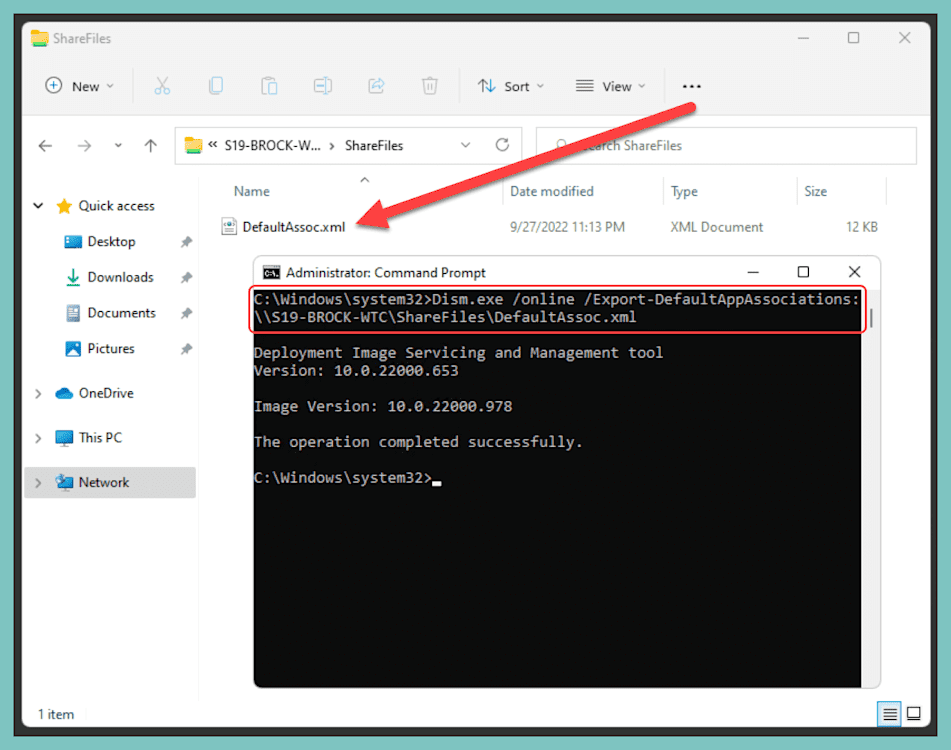


Import a default application association XML
We can use a few different methods to import a default application association XML. The first is to mount an offline Windows image, then import the file using these commands:
Dism.exe /Mount-image /imagefile:<path_to_Image_file> /MountDir:<target_mount_directory>With the image mounted, use this command to import the app association file:
Dism.exe /Image:C:\<target_mount_directory> /Import-DefaultAppAssociations:\\<server_name>\<share_name>\Appassoc.xmlAlternatively, you can use a script to run the import command during a post-deployment task, such as during the Specialize or First Boot phases.
Lastly, you can distribute the application association file with Group Policy.
Open Group Policy Management.
Right-click on the OU you wish to apply the policy to, then click Create a GPO in this domain, and Link it here…
Name the GPO, then click OK.
Right-click on the newly created GPO, then click Edit.
Navigate to Computer Configuration > Policies > Administrative Templates > Windows Components > File Explorer.
Double-click the Set a default associations configuration file policy.
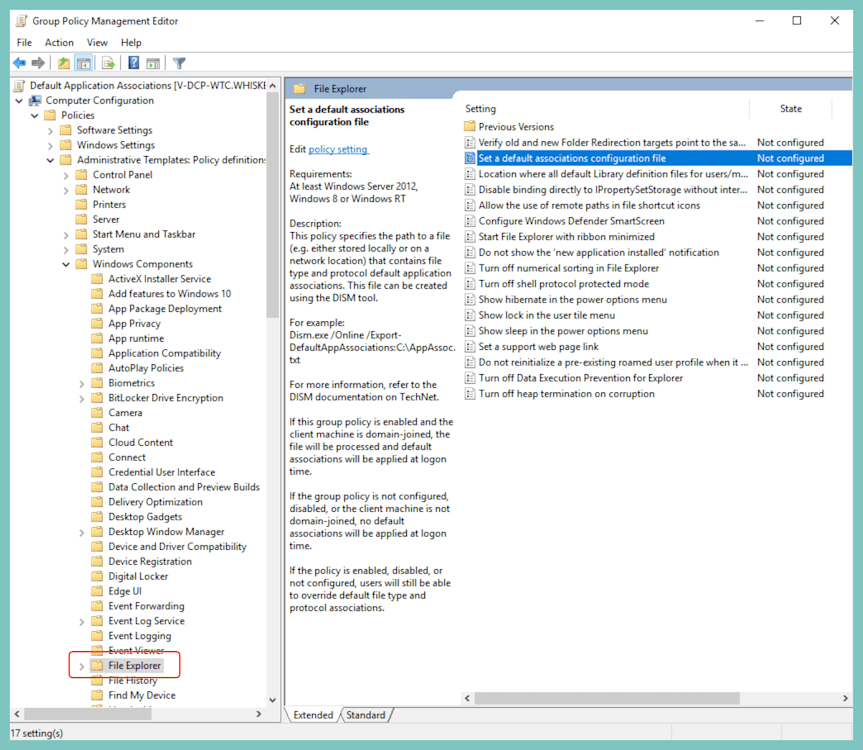
Select Enabled.
Enter the path to the default application association file you exported.
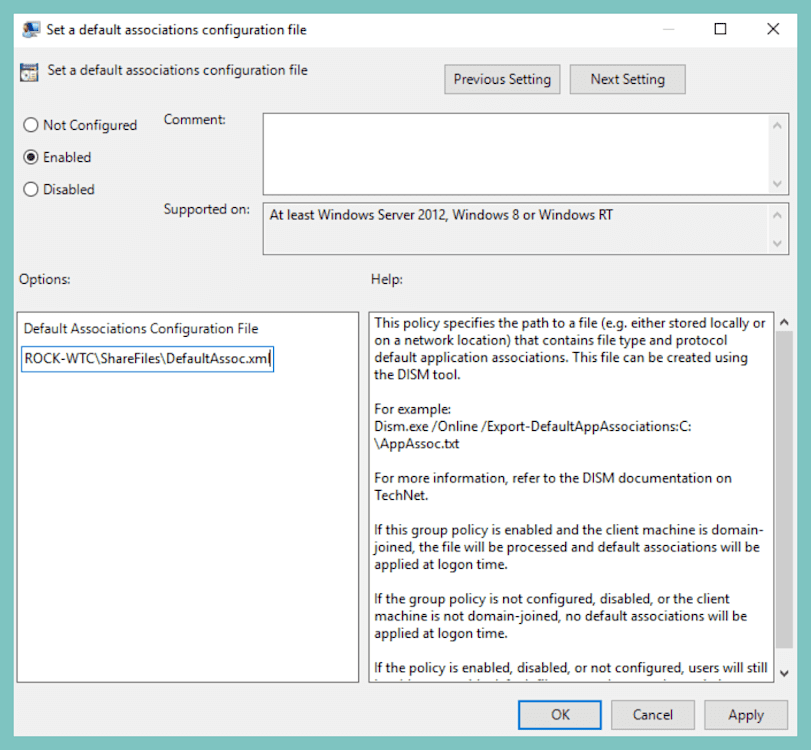
Click Apply.


If you choose to utilize this policy, the default app association file is processed and default associations are applied during the first sign-in.
How do you set a desktop background image with Group Policy?
Lastly, we’ll configure a desktop background image to round out our default profile.
And, if you’re feeling particularly power hungry, we can also make it so users can’t change the image. (Don’t worry, I won’t judge you.)
Here’s how to do it:
Save your desktop background image to a shared drive. Your users need to have read access to the share.
Open Group Policy Management.
Right-click on the user OU you wish to apply this policy to.
Click Create a GPO in this domain, and Link it here…
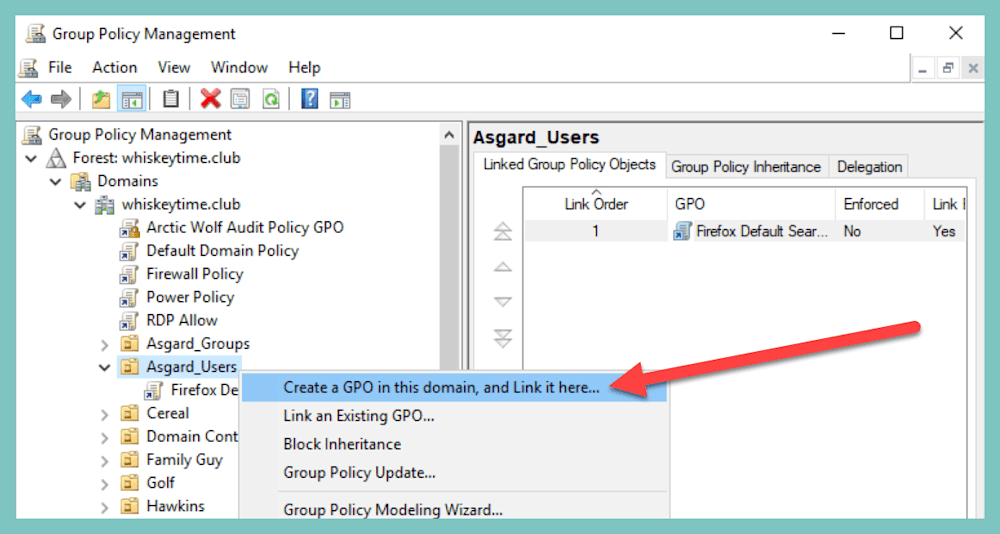
Name the GPO, and click OK.
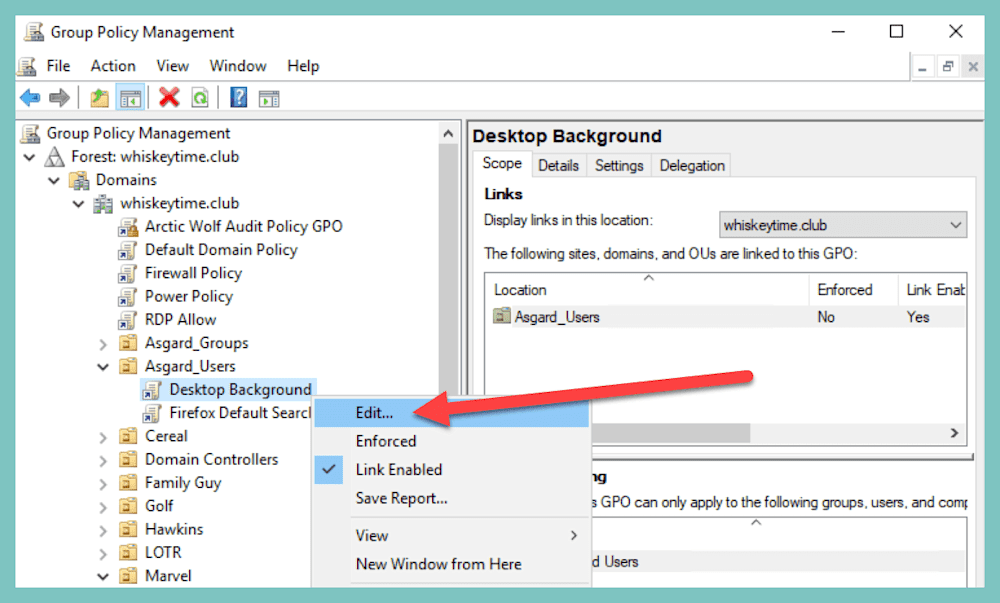
Right-click on the newly created GPO, and click Edit.
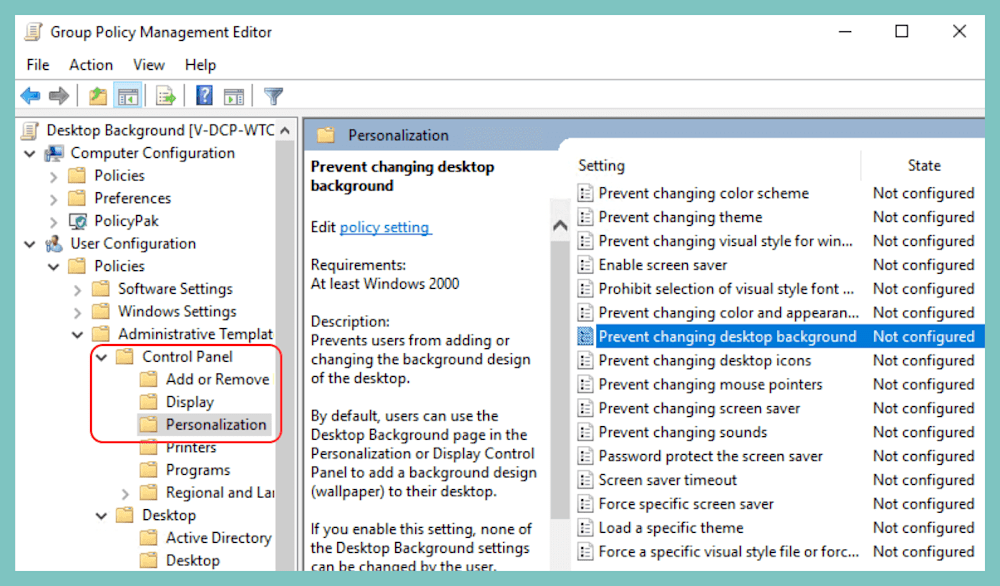
Navigate to User Configuration > Policies > Administrative Templates > Desktop > Desktop.
Double-click the Desktop Wallpaper policy.

Select Enabled.
Enter the share path to the desktop background image.
Select Fill for the Wallpaper Style. You may need to test this setting to ensure the image is sized correctly on your devices.
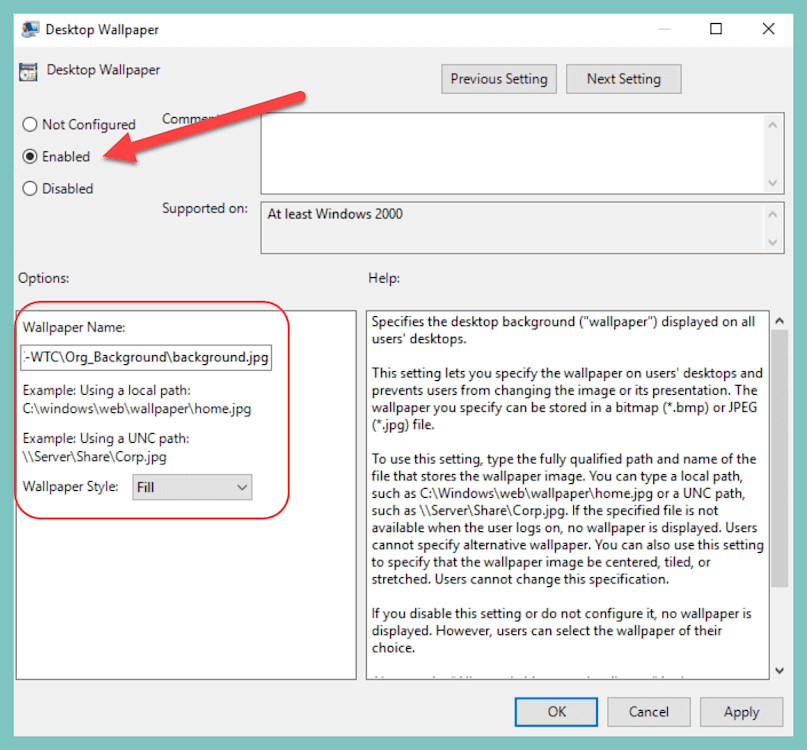
Click OK to close the policy.
Expand the Control Panel directory, then click the Personalization folder.
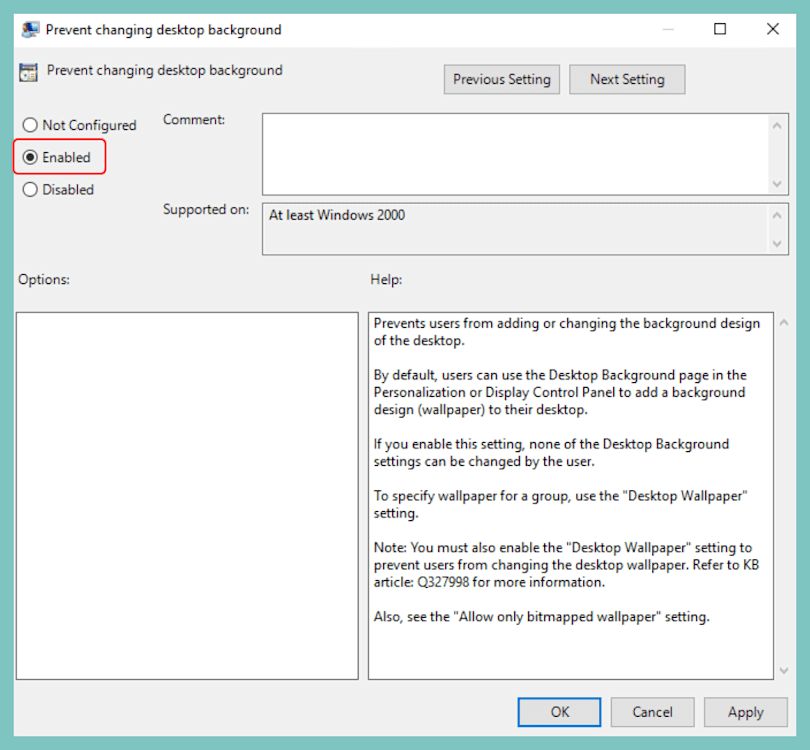
Double-click the Prevent changing desktop background policy.
Select Enabled, then click OK.


Now your users will be stuck rocking that sweet company background image. I hope you’re proud of yourself.
Windows 11 significantly limits how much of the user experience can be predefined. Start menu layouts, taskbar pins, and certain UI elements may reset after feature updates or differ between builds.
For supported, update-resistant enforcement of policy-backed settings, Microsoft now expects organizations to rely on MDM (such as Intune or equivalent). As a result, default profile customization should be treated as a best-effort convenience rather than a durable control mechanism.
Microsoft giveth, and Microsoft taketh away. And default profiles are just the tip of a very large iceberg. Such is the lifecycle of Windows OS releases. To be fair, though, Microsoft has every right to evolve the Windows ecosystem to adapt to technology trends and defend against the latest security threats.
But why wait for the powers that be when you can take the fate of devices into your own hands, powering up your administrative tasks and endpoint management right now? With SmartDeploy, you can deploy applications, drivers, OS updates, and even Windows operating system images to local and remote devices with an internet connection — no VPN required. Download a free 15-day trial to explore the full range of features and functionalities.
